How to install the latest version of nginx on Ubuntu Server 12.04 LTS or 12.10
If you run Ubuntu Server 12.04 LTS or 12.10 you can’t install by default the latest version of nginx. To see what version you are going to install use this command:
sudo apt-get -s install nginx
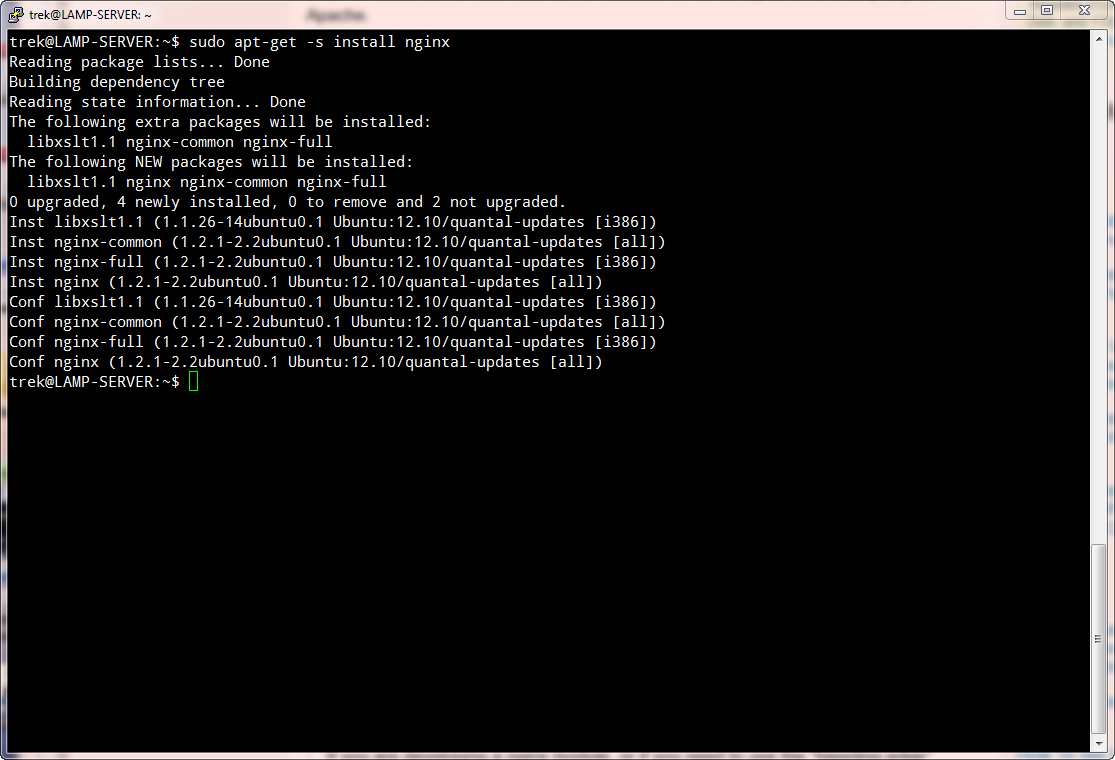
As you see by default the Ubuntu 12.04/12.10 will install the version 1.2.1-2.2 of nginx. But this isn’t the latest (when I wrote this the latest version of nginx was the 1.4.3-1) . We want the lastest version so we have to add its repository. To do this first we have to install some programs. So:
sudo apt-get install python-software-properties
If your server running the version 12.10 of Ubuntu Server you also need to install:
sudo apt-get install software-properties-common
Than we can add the latest repository of nginx:
sudo add-apt-repository ppa:nginx/stable
When we add a new repository so we have to update the list:
sudo apt-get update
You can check again if you want what version of nginx will be install. But we are gonna install it anyway. So, lets do it.
Installing nginx on Ubuntu
At Ubuntu Server we install nginx with the command:
sudo apt-get install nginx
To start the nginx you type:
sudo service nginx start
Alternative you can also start nginx with the command:
sudo /etc/init.d/nginx start
But there is really no need to make things harder. Let CentOS users to start services this way 🙂
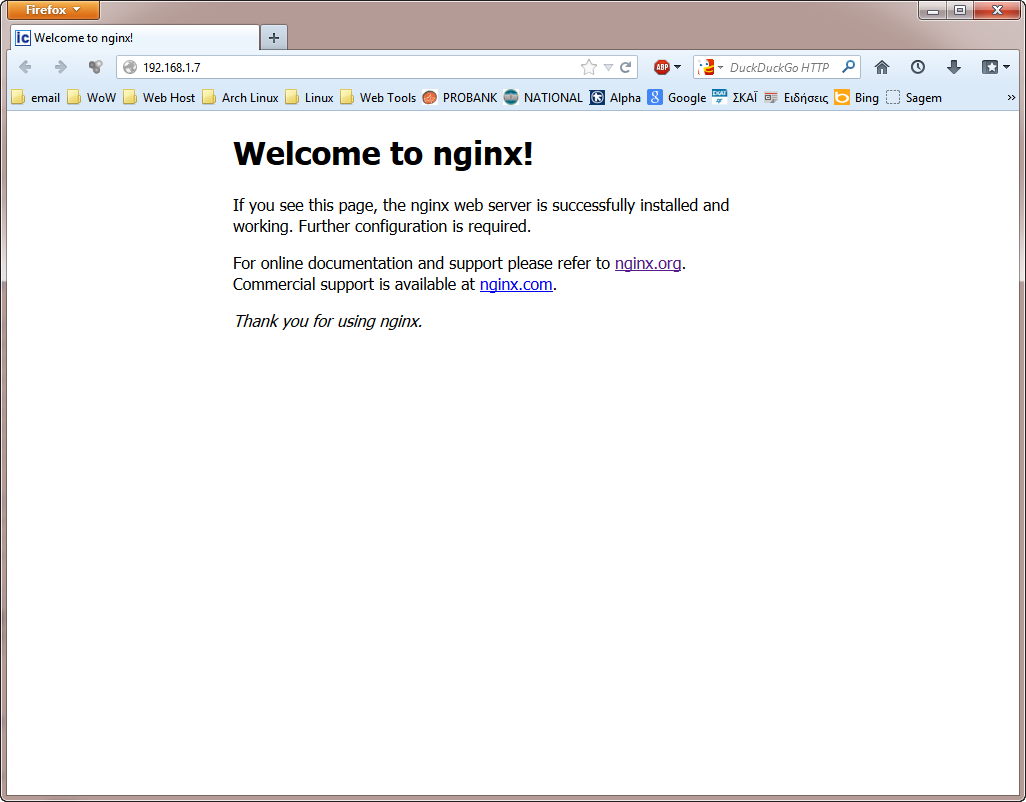
Check if nginx service started
This is easy. Just type the server’s IP address (e.g. 193.128.115.23) or the domain name (e.g. example.com). You must see the welcome screen of the nginx:
Install MySQL or MariaDB
If you want to use WordPress or any other CMS program you have to install MySQL or MariaDB. MariaDB is a fork of MySQL, it’s compatible with Oracle’s MySQL and it’s consider a better choice. The default settings of MariaDB needs more memory so you have to tweak it a bit. If you have a low memory server and you don’t want to mess with the my.cnf file than preffer MySQL.
MariaDB
To install MariaDB than you have to install first the proper repository. You can get the links from here . Select your distro and the version of MariaDB you want to install. If you want complete compatibility with MySQL and the stable version select the 5.5. The version 10 is under development and has some unique characteristics. But for now I will go with the stable version 5.5.
For me, with Ubuntu 12.04 LTS I used the commands:
sudo apt-get install python-software-properties

sudo apt-key adv --recv-keys --keyserver hkp://keyserver.ubuntu.com:80 0xcbcb082a1bb943db

sudo add-apt-repository 'deb http://mirror.1000mbps.com/mariadb/repo/5.5/ubuntu precise main'
After that I installed MariaDB with the commands:
sudo apt-get update

sudo apt-get install mariadb-server mariadb-client
MySQL
If you prefer MySQL use this command to install it:
sudo apt-get install mysql-server mysql-client
Please Note:
After installing MariaDB or MySQL edit the file /etc/mysql/my.cnf and check the line «bind-address». If «bind-address = 127.0.0.1» than you can’t remote access your database. If you want remote access to your database from any machine set the value 0.0.0.0 (« bind-address = 0.0.0.0»).
To complete the installation of MySQL or MariaDB you have to:
sudo service mysql stop

sudo mysql_install_db

sudo service mysql start

sudo mysql_secure_installation
Install PHP-FPM
If you want to serve only static pages you don’t have to install php. But usually you need php5. With nginx you have to install PHM-FPM (FastCGI Process Manager). To do so write:
sudo apt-get install php5-fpm
You must also install some php5 modules. One of them is php5-mysql for MySQL support in PHP. With WordPress and probably more cms you also need php5-gd. To install those 2 write:
sudo apt-get install php5-mysqlnd php5-gd
In case you want to install OpenCart you have to install also the php5-mcrypt and php5-curl. You can also install the php5-imagick.
To see what other php5 modules you can install and a description for them write:
apt-cache search php5
I also recommend to install php5-xcache. XCache is a PHP5 opcode cacher like eAccelerator and APC. PHP opcode cachers really speed up pages with php (like WordPress) so its a good thing to install one those. I am using XCache without problems till now but I don’t have any knowledge about APC or eAccelerator. Use what you like but only one of them. In next posts I will tell you how to setup the program and how to set the admin page. But usually XCache works fine without settings. So until the next article use as is or wait…
To start the php5-fpm service write:
sudo service php5-fpm start
Now, lets setup the php5-fpm. PHP5 FPM by default is configured to use the tcp port (127.0.0.1:9000) but it can be set to use a unix socket (/var/run/php-fpm.sock). I set it to use unix socket because I had problems with the default settings. I am not telling that default tcp port is wrong setup. But I had problems (probably is my fault, I don’t know but I will check it when I find the time).
Modify the configuration file for various hosting sites
For every site we host at the same server we will make a different configuration file. At first we will make the changes to the default file and later we will make copies of this file for every site we need to host. It is recommended to make comments for every change you make so later it will be easy to enable or disable them.
We are going to modify the file /etc/nginx/sites-available/default so you maybe want to make a backup first (if you want). We will not make all the changes now to this file. Later we will modify it more and we will make it ready to create our virtual hosts with it. For now we will make basic changes mostly to activate FastCGI for php-fpm.
| server { listen 80; #listen [::]:80 default_server ipv6only=on;root /usr/share/nginx/html; index index.php index.html index.htm;# Make site accessible from http://localhost/ server_name localhost;location / { # First attempt to serve request as file, then # as directory, then fall back to displaying a 404. try_files $uri $uri/ /index.html; # Uncomment to enable naxsi on this location # include /etc/nginx/naxsi.rules }location /doc/ { alias /usr/share/doc/; autoindex on; allow 127.0.0.1; allow ::1; deny all; }# Only for nginx-naxsi used with nginx-naxsi-ui : process denied requests #location /RequestDenied { # proxy_pass http://127.0.0.1:8080; #}#error_page 404 /404.html;# redirect server error pages to the static page /50x.html # #error_page 500 502 503 504 /50x.html; #location = /50x.html { # root /usr/share/nginx/html; #}# pass the PHP scripts to FastCGI server listening on 127.0.0.1:9000 # location ~ \.php$ { try_files $uri =404; fastcgi_split_path_info ^(.+\.php)(/.+)$; # # NOTE: You should have “cgi.fix_pathinfo = 0;” in php.ini # # # With php5-cgi alone: # fastcgi_pass 127.0.0.1:9000; # # With php5-fpm: fastcgi_pass unix:/var/run/php5-fpm.sock; fastcgi_index index.php; include fastcgi_params; } |
I marked bold the changes and with green something you have to notice. Lets see what I did:
- I removed the default_server from line “listen 80 default_server;”
- I commented the next line “listen [::]:80 default_server ipv6only=on;”. My server don’t support IP6 yet so I can’t tell you anything.
- I added index.php to the line “index index.html index.htm;” because I want to search for the index.php
- Uncomment the lines
- location ~ \.php$ {
- fastcgi_split_path_info ^(.+\.php)(/.+)$;
- Uncomment the lines
- fastcgi_pass unix:/var/run/php5-fpm.sock;
- fastcgi_index index.php;
- include fastcgi_params;
- }
- I added under the line «location ~ \.php$ {» the line
- try_files $uri =404;
Watch the text I marked green (in the box above). It says that we have to set the “cgi.fix_pathinfo = 0;” in the php.ini file. You can do it to follow the rules (its safer due to a bug) but i think that there is no need if you add the line «try_files $uri =404;» (marked with blue color).
If you want to change the cgi.fix_pathinfo than:
sudo nano /etc/php5/fpm/php.ini
Find the line it says:
;cgi.fix_pathinfo=1
and change it to
cgi.fix_pathinfo=0
Then we have to reload nginx and php5-fpm
sudo service nginx reload

sudo service php5-fpm reload
alert("Test.");